Bright and Sunny: The Sun Room

One of the most common things people said to us when we bought the house was, “What are you guys going to do with that back room?”  They were referencing an addition to the back of the original house from probably the 60s or 70s.  They took what used to be a covered walkway connecting the kitchen to the garage and enclosed it and built it out to be a family room.  It acquired several nicknames quickly:  “the dungeon”, “the smoking room”, and “the paneling room” to name a few.  It is the largest room of the house with wood paneling walls, acoustical tile ceiling, and green mosaic linoleum flooring.  The paneling seemed to have a dark ring of smoke, nicotine, and who knows what else around the top.

A neighbor told us this is where the last owner spent most of her time because it has a ton of natural light and looks out to the side and back yards.  Besides, it has a lot of room and is right off of the kitchen and dining rooms.  Here are the before pictures:  (check out the gas log fireplace and the old gas heater in the wall)


We knew we wanted the room to be light and airy with neutral colors.  Since the floor in this room was lower than the rest of the house, we figured we could do something interesting with the ceiling.  We wanted to have a coffered ceiling like the one in the picture here, but we needed a less expensive alternative.

We decided the alternative was to get sheets of plank board and trim it out in rectangles to get a similar look of a coffered ceiling.  We also added just a few recessed lights just because–and by “we”, we mean we came up with the design and the contractors put it up!

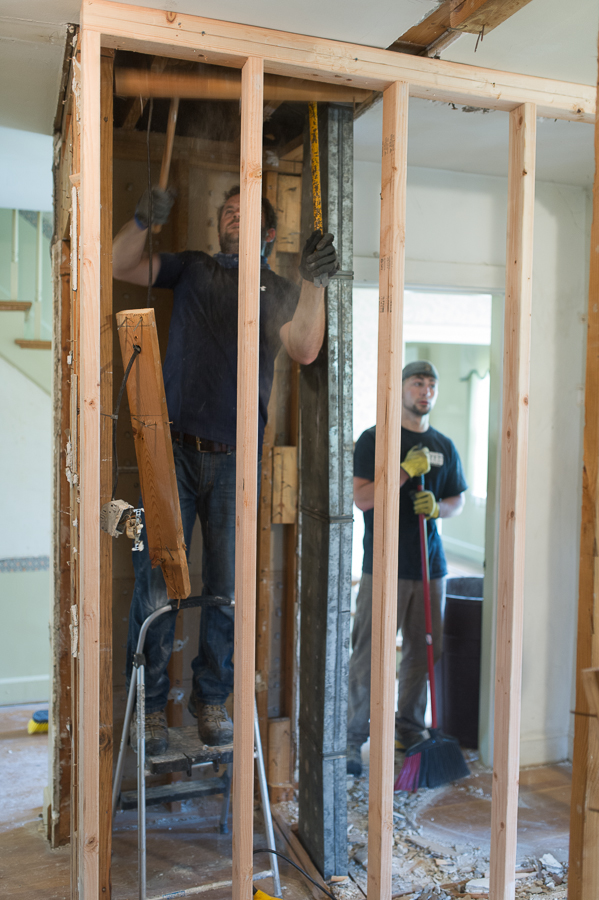
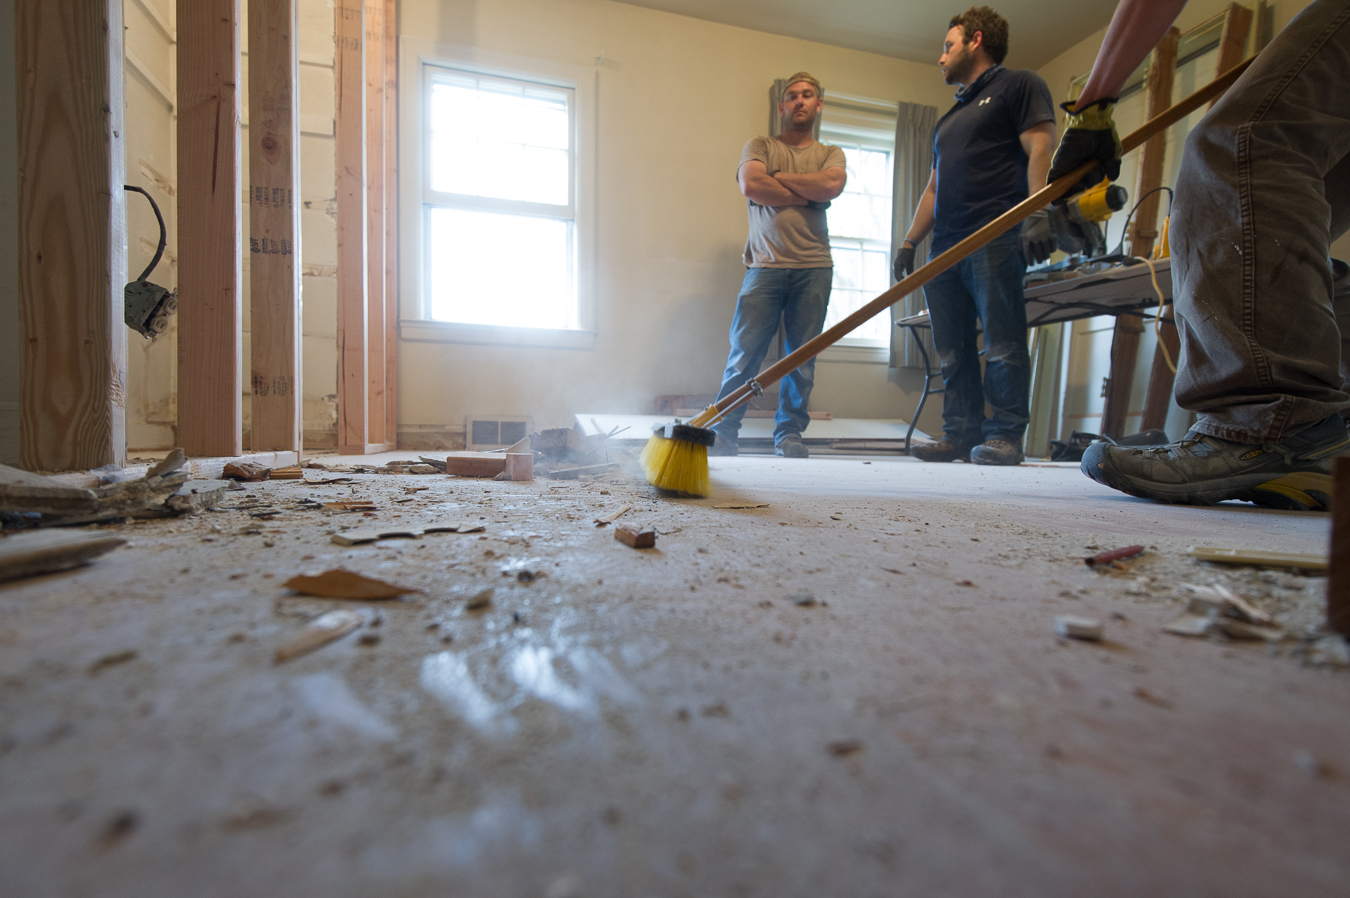
We had originally planned on putting the plank board right on top of the acoustical tile.  However, when the fans were taken down, we found out that there was no insulation in the ceiling!   SURPRISE!  So then the plan was changed to take down the acoustical tile, and insulate!  And FYI we did have it tested for Asbestos, and it was negative! Here’s the mess after the acoustic tiles were torn down!

NOW INSULATION!

For the floor, we decided to go with charcoal gray 2’x1′ rectangular tiles in a 1/3 pattern (you may recognize these from the master bathroom) laid in the direction that would make the room feel wider.  Here was pin on Pinterest that reinforced what we wanted!

The fireplace was pretty basic with NO character so we wanted to make it more substantial since it is the focal point of the room.  This is the pin we used for inspiration!

We were originally going to tile around the fireplace insert, but we decided that with the wood trim, the granite hearth, and the ceramic floor, it would be too much!  Then we decided we would paint the brick, but once the trim and everything was in place, we liked it as is–AND that meant less painting for us!

We instinctively knew this is where we would spend most of our time as previous owners had, so we wanted to have a TV mounted above the fireplace.  Our contractors took care of placing the brackets and they also wired it to have an electrical outlet and HDMI connection (brilliant!).  Here is a look at the renovation in progress.

For the walls, we had a couple of options–keep the paneling (yuck!), paint the paneling, or replace it with drywall.  The drywall would have been the most expensive route so we looked up methods on painting wood paneling and it was a bit daunting.  We tried to sand and prime it, but the primer just scratched right off (we used Kilz 2).  We talked to an employee at Lowe’s and he directed us to a great primer to use (Zinsser Bulls Eye 1-2-3) and told us the Kilz was the worst primer they had!  Great!  No sanding was needed and this new primer went up with ease.  We painted a large section white to see how it would look.  As it turns out, we didn’t like the look at all because you could see every gap between each sheet of paneling and to fill and smooth out those places would have been extremely labor intensive!

Finally, we thought of covering the paneling with grasscloth wallpaper.  We knew we really liked the look because it was textural and neutral.  All we had to do was prime and paint the walls and the grasscloth was ready to go up.

Next we also replaced all of the windows in the room.  Two were old single pane crank windows, and the other 2 in the room were relatively “new” vinyl windows with a “wood” finish.   So we called Jon at Gilkey Windows, and he took care of us!  We can’t say enough good things about them, if you need windows, siding, gutters, etc., call Jon, he’s the best.

AND FINALLY! The room was done! Now we could move stuff back in.  Because the room is long, we divided the room into 2 areas: one facing the fire place, and one smaller area by the windows in the back of the room.  This allowed us to have plenty of space to host guests, as well as a space for the 2 of us to have as a small sitting area with a table, kind of like a breakfast nook.

Here’s the room! (As always, click any image to enlarge!)


photos courtesy of Shaun Ring.


Masterbath Masterpiece

Okay!  We got the foyer done and the half bath up and running, so all the big time demolition was finished… or so we thought.  Up until that point, we were so very lucky to have our beloved friend, Esther, open up her gorgeous turn of the century, Victorian home to us.  All to keep us comfy and cozy in her house while all the destruction and construction was happening in ours.

Next on the list was to do something with that big wood paneling, acoustical tile filled addition to the back of the house.  But honestly, having to use the old dingy bathroom was turning out to be no fun at all.  After giving it much thought, we ultimately decided to invest in something that we would enjoy a little more every single day… a new master bathroom.

Now that all the guests had a place to potty on the first floor, we could finally turn the original bathroom into a true “master bath” masterpiece.

We’ve already told you about the original bathroom in detail in our previous blog, Ceramic Tile City.  In our post Bathroom Bliss we told you about what inspired us for this project including fixtures, color palettes, and finishes.  We tried to come up with the most functional layout with the then size, but unfortunately we just needed a little more room.  The decision was made to tear down the wall where the bathroom door and the built-in bookcase were and build a new wall in order to gain 10 inches of additional floor space.  Finally, it was time to move forward and say bye-bye to the glory that was the first floor bathroom.

If you’ve ever tackled home renovation project, you know that it’s the first couple of days that you notice the biggest difference.  We came home from work on day one to this…

We had no clue how they managed to get that big cast iron tub out of the house, and we’re not sure we even want to know.

Originally, the window was planned to be covered up so a walk-in shower could spread across the back wall with the new toilet and vanity against the right wall.  Before day 2 began, a last minute decision was made to give the whole design a literal 180 degree rotation.  That would provide an entrance directly from the bedroom and truly make this a master suite.

During our (extended) stay with Esther, we got all kinds of inspiration from one of her showers.  First, we chose to use a rain shower head that drops from the ceiling on the right side of the shower while the valve was placed on the left side.  This way, you can turn the water on and stand in the shower completely dry while your water warms up!  This also eliminated the need for a shower door.  Instead, we had a shower wall glass panel installed by our friend Doug from Showcase Showers.  This really opened up the entire space and saved us a lot of money on Windex.

Since the walk-in shower takes up so much space, we wanted to make it interesting.  We used tiles with an antique brass finish to trim out the entire shower and used marble tiles in a chevron pattern to create the feature wall.  This is usually the first thing people see when they walk in, so why not love it?

The bathroom walls were painted Repose Gray from Sherwin Williams to tie together the gray tones in the marble tile and vanity top.  The ceiling and trim are painted Snowbound, of course.  Using the vanity and lights we loved and an etagere for extra storage, we added the finishing touches.  Here’s the finished product!  We love it, it’s no million dollar bathroom, but we think it’s a master bathroom masterpiece…at least for us! 🙂

Out of the Closet

In our former home the townhouse, we had a powder bathroom on the main floor that always came in very handy when guests were over.  However, in this house the only bathroom on the main floor was the master bathroom.  And if you’ll remember, it wasn’t that pretty…

IMG_4535

original master bath

So as you can imagine, adding a half bath was at the top of our checklist.  There was way more storage space in this house than we could ever use and not enought toilets, so we decided to combine the coat closet and a small linen closet into a powder bathroom.  Only one big problem… Have you ever tried to sit on the throne in your coat closet?  As it turns out, we needed 5 more inches.  Cue the sledgehammer!

If only moving a wall were just that easy, if it was only simply sliding it in place.  What we really mean is tearing down an existing wall and building a brand new one…literally 5 inches from where it was to start with..  Images of this demo were in our blog called “Ready, set, demo”.

DSC_1319

You can see the door in the center left to the coat closet, and then on the center right the thin door to the hall closet here that were combined to make the powder.

Because the foyer was totally trimmed out, we didn’t want the bathroom to go neglected and seem forgotten.  We also didn’t want it to seem like a little trim cave up to the ceiling, so we did board and batton trim a little over half way up the wall, and finished with crown molding at the top.  The paint colors were the same that we used in the foyer:  Anew Gray for the walls and, of course, all the trim is Snowbound.

Since this is just a powder bathroom, there was no real need for a vanity with lots of storage so we chose to do a simple pedestal sink.  For the light fixtures and faucet finishes, we wanted something that spoke to the true era of the house–something not too modern but not antique.  We chose a mixture of antique brass and iron for the sconces and faucet; something we plan to carry throughout the entire house.

When it comes to decor in a powder bathroom, there’s not much, which means everything you use should be special.  Although we used a pedestal sink from Lowes, we didn’t want the details to look like they came from Lowes.  So for the mirror, our hunt took us to many stores and eventually online to etsy.com.  Here we found someone who could hand-make a mirror out of an antique horse bit and bridle.  We love that we have something unique in there! 0076

0061Although there is no image of the toilet in the powder, it is there.  Not surprising, they don’t photograph very well.  “You just can’t make them look sexy”, says our photographer/realtor/friend Shaun Ring.

Even though the room is barely 3’x6.5′, we tried to add the detail that would make it special and interesting! It may be easy to think “Hey, it’s a small powder room, it doesn’t need anything special”, but we think that’s a lost opportunity for great detail. A few pieces of wood, great lighting, and accessories can make a big impression! Not bad for coming out of the closet! 🙂


First Impressions

We finally have updates!!!!

Just a reminder of what we were working with here.

We showed you in our previous blogs “What goes up, must come down” and “Trimming out the foyer” the inspiration for the foyer as well as the mess of taking down all the old wallpaper(s).

First things first, we had to deal with the old vinyl tile floor throughout the foyer and dining room.  We knew underneath was the original hardwood floor, although we didn’t know what condition it was in.  What else we didn’t know was that under the tile was a thin piece of lauan which was attached to the hardwood with 3,000 stables that had to be yanked out by hand.

We celebrated our triumph over the staples, a task we never thought would end!  The floors were then refinished, then FINALLY we started to get the trim up on the walls.

On the second floor, we decided to paint the top 1/4 of the wall Anew Gray from Sherwin Williams.  We debated using grasscloth here, but to keep costs down we decided to paint because we can add grasscloth later if we want.

In case you didn’t know, there are approximately 100 million “whites” to chose from when searching for a paint color.  We knew we had to get it right because you see so much of it and it’s the first thing you see when you walk in the door.  We wanted something bright and crisp, but nothing florescent.  We chose “Snowbound” from Sherwin Williams.  This decision set the tone–if you will–for the rest of the trim throughout the whole house.

Lets fast forward past 14 tubes of caulk, a 4-hour sanding party, 2 layers of primer, and 4 coats of paint.  Here is the final result–as it would be, we trimmed it in white!  FUN FACT: There are 97 squares in the foyer!

You may notice the lack of hanging wall art.  We debated whether to hang art or not, but ultimately decided not to because we wanted to showcase the trim.

0056

We found a carpet remnant from our friend Carrie at Carpet One that we had installed as the runner for the stairs.  We totally lucked into finding something that we loved so quickly, not to mention it was a great wool carpet that originally was expensive, but as carpet left over from a previous job was inexpensive.  What we didn’t think we were going to find so easily was a light fixture for the foyer.  Every night after caulking and painting, we would search the internet for the right fixture.  We weren’t having any luck as nothing seemed to fit the bill. Every one we seemed to like was at least $800 or was back-ordered.  So, just to move forward with a temporary fix, we decided to use a fixture that we had in a cardboard box for at least 7 years. It was a light that we had bought at a super clearance sale that was just to good to pass up, but had never had the right place to put it.  Much to our surprise after putting it up, we thought it was perfect and decided to keep it.  It was small and it actually fit the bill-not too ornate, and updated traditional.

All in all, the foyer wasn’t an inexpensive feat, but it has been worth every dime because it’s what everyone talks about when they first walk in, and we still LOVE IT!!!

Special thanks to our amazing photographer and realtor friend Shaun Ring for taking the awesome photos!


Bathroom Bliss

We needed a little inspiration.  Obviously, most people go straight to Pinterest for inspiration, which can be both good and bad, because you can find many things that are drop dead gorgeous, but they’re also drop dead expensive and sometimes do not work with the space you have.  We knew we wanted marble, masculine, and sexy.  We didn’t want to go too modern because of the style of the house, so we just wanted updated traditional.

Something we loved about this shower is how they used the different patterns of the same tile to create a textural backdrop in the shower.

In this bathroom, we loved the dark, dramatic feel.  We also liked the wood vanity against the dark floor and walls, but our space was way too small for a bathroom this dark.

We liked this bathroom for its country look and feel.  We knew we only had room for a single sink vanity and like the double doors on the cabinet.  We also like the sconces on each side of the mirror.

Probably the most inspiration we gained was from this stunning bathroom.  In the tile pattern, the warm gold accent mixed with the white and gray carrera marble created a color combination that was unusual and had a timeless feel.  We checked in to a tile similar to it, and it priced out at $40 a square foot.  That just wasn’t in our budget.

After we saw the gold/antique brass color with the white and gray marble, we knew we just had to do it but we weren’t for sure how to pull it off with the tile, the lights, and all the fixtures… until we found this!

prod691173_F11

Milk glass sconce from Restoration Hardware

Most of the light fixtures we could find were all nickel or chrome, and we knew we wanted something that looked like it was meant to be with the house.  We didn’t want to buy an older home, gut it with all of this super modern shiny stuff, and lose all of the charm we had been searching for in the beginning.  So this light fixture totally started the whole course for the the bathroom remodel.   We decided that we wanted to really use the antique brass as an accent with the entire bathroom, which we thought was going to be really hard, but it didn’t turn out that way.

When it came to tile, we knew we wanted carerra marble, but couldn’t spend a fortune on it.  Little did we know that there are other kinds of marble, that look very similar to carrera, but don’t come with the same price tags.  We also knew we wanted to do a different pattern in the back of the shower made out of the same material, and that some how we wanted some kind of antique brass detail.  We were a little concerned that the brass would seem odd coupled with the cold white and gray marble, but that’s when we found a white marble that had both gray and brown tones running through it! BINGO!

IMG_4435

Our plan was to use to the white marble subway tiles for all of the walls, and then use the herringbone tile mosaic as an inset on the back wall.  We would then use the antique brass border seen at right in image to wrap around the back inset herringbone panel.  For the floor,  we actually decided to use 12″x24″ ceramic tiles that are finished to a gray/black finish like concrete.  There’s a long funny story about the floor, that we won’t bore you with, but we got it for $ .90 a square foot,  where other actual concrete tiles were $12 a square foot!

IMG_4464

Then we found the faucet!

81Eis9cBXXL._SY355_

It’s hard to see in this image, but the top of the cross bars have a white inset with a C and H on them.  They look so historical! Exactly what we wanted.  We found this one online, but had a lot of difficulty finding shower valves and heads to match.  So we went to Ferguson’s, and Kristy helped us find exactly what we wanted: a cross handle and a rain shower head.

T14097-CZLHP_H795CZ-B1


Finding the vanity was hardest part.  First, they aren’t cheap.  And second, there are a lot of options out there.  However, we were looking for a specific look and style: old piece of furniture, marble top, matte wood finish.  With those in mind, that meant that options were limited.  We found a couple of pieces from Restoration Hardware that we really liked, but as you can imagine….vanities from them  weren’t cheap.  With all of the people that we had talked to who had gutted their master bathrooms before, there was one constant in all of the conversations.  They wished they would have bought the vanity they really wanted, and not settled.  Hearing this time, time, and again, we really wanted to do it right the first time, so we were  prepared to do that, even if it hurt a little in the wallet.

Then one day, we found this vanity, and the rest was history!

bath-vanities-fairmont-142-FV36-room1We love farmhouse sinks, and never imagined finding one for the bathroom! It was immediately love at first sight.  Now we had all of the stuff, now we just needed to demo!

Ready, set…where’s the sledge hammer!

Ceramic Tile City

As we know, there are two things that sell homes:  bathrooms & kitchens.  The bathroom above would have been the IDEAL master bathroom for this house, but instead… THIS is what we bought.

IMG_4535452

A concoction of colors and patterns of years past that just screamed, “RUN AWAY FOOL!”  This bathroom was complete with the finest baby blue ceramic tiled walls, with built in ceramic soap dispensers, toothbrush holders, and toilet paper holder.  Two formal, antique gold, neoclassical sconces that flanked a built-in medicine cabinet popped beautifully off the palm tree patterned wallpaper.  It was clearly a bathroom that had been forgotten or decorated by someone with multiple personalities.  The only thing in this bathroom that wasn’t a complete disaster was the black and white ceramic floor tile.  But even that had missing grout and carpet glue residue stains.  Oh that’s right, someone put carpet in here once upon a time.  The bathroom seemed small and cramped.  Everything was wedged into place for this bathroom just so that it could all fit.

We were going to focus on renovating the sunroom first, but quickly changed our minds after getting ready in this bathroom every morning for 2 weeks.  All we needed was a little inspiration! And we didn’t have to look far for that, ready PINTEREST!


Trimming out the foyer

Unlike our last house, this house actually has a foyer.  Before, you walked directly into the kitchen, so we focused on trying to make that space welcoming–which often times with dirty dishes was an uphill battle.  This foyer–as bad as the wallpaper was–was already pretty welcoming, but we really wanted to make a bold statement, and how else did we do that but with trim!

Here was our inspiration…

79798652d744e109d59e74377f8c020e

When it comes to trim, both of us prefer shaker or simple flat panel styles.  Our overall taste is updated traditional, with the keyword being “updated”, meaning having traditional lines in updated refined finishes.  So when this crosses over to trim, less detail is more.  Here are the current in-progress photos of our foyer.

We continued the trim-work throughout the foyer, up the stairs, and around the 2nd floor landing.  On the landing, we stopped the trim 3/4 of the way up the wall and added a ledge.  We will either paint an accent color or add grassclothe to the top.

There is still more work to do!  Nail holes have to be filled and sanded, the edges need to be caulked and primed, and then finally painted… WHITE!

We love trim!

We love trim.  Crown moulding, wainscotting, plank, beadboard…we could go on, but we’ll save you the bore.  What we love even more, is trim painted white (cue naming the blog Trim It In White).    It really is a fool proof way to add character to a space.  Here’s an example of that, this is what we did in our old home- a boring old duplex.

So when we bought our current house that had so much character on the outside, we knew we wanted to add a lot of trim to this house, so off to Pinterest we went for inspiration.  Here are a few things we just loved and wanted to try to use in our Powder bath and Foyer.

If you would like to follow Big Jeremy’s Pinterest board affectionately called “I love trim” please see below!


What goes up, must come down

If there’s one thing we know, a fresh coat paint can totally change a room.  However, before we could even think about paint colors, we had to get down wallpaper. Fortunately for us, there was only one space that had existing wallpaper, and that was the foyer.  Over the years, we’ve heard many horror stories of people spending hours and hours taking down wallpaper, and were hoping that we wouldn’t  have our own war story to share as well in the end.

After talking with some of our friends about their experiences, we found that the most popular method of wallpaper removal is by magical powers of a wallpaper steamer.  We were fortunate enough to have not one, but TWO people lend us their steamers, and THANK GOD!  Honestly, the steamer was a game changer… and a sanity saver… and a relationship saver.

You never know what lurks behind wallpaper.  For us, we found that behind layer #1 was layer #2.  Behind layer #2 was the original plaster, which was in great shape.


Over about 4 nights, working 4 or 5 hours a night, we were able to tackle all of the wallpaper.  Once you get the hang of it *pun intended*, you can really speed through it.  Before you know it, you’ve got a really big sticky, smelly pile of wallpaper.

It truthfully wasn’t that bad and we knew what we were working towards, so the sweat equity made it all worth it.

Most photos via crappy Iphone camera, great photo by shaunring.com

Ready, Set, Demo!

Before the ink was even dry on the contract, the half-bath demolition commenced.  Our house only had one full bathroom on the main floor, but more storage than we knew what to do with, so the plan   was to combine two coat closets off the foyer into a half-bath for all of our guests to use.  Fortunately, for sake of the house, we weren’t the ones doing the work.  That’s why we hired wonderful contractors!

DSC_1489

DSC_1500

That wasn’t the only project that started on day 1!  The foyer and dining room floors had been covered over with the ugliest vinyl tile flooring east of the Mississippi!  And probably west of the Mississippi too, for that matter.  We knew that we wanted to rip it up, but we had questioned what the situation was like underneath the tile.  Was it beautiful hardwood or was it hardwood that had been destroyed?  or God knows what else.  We had a chunk of it removed and tested for asbestos.  It truly wasn’t as scary as it sounds, but we wanted to make sure we weren’t going to be part of a class action lawsuit with mesothelioma.  Fortunately, it was negative…. so up it came.  Beneath a sea of a thousand nails and staples, the floor was actually in great condition.  It just needed to be refinished.

before:

after:

photos via shaunring.com


Female, 62 yrs old, with wrinkles, looking for attention

Have you ever met someone that looks better far away than up close?  Some might call them “a Monet”.  Well, she certainly was one (yes, the house is a she).   We could see past the pictures online and see the potential that this house had. However, what we couldn’t see was all the peeling paint, cracked plaster, water damage, overgrown ivy, unattended landscaping… we could go on, but we’ll just leave it at that.  You’ve heard that a picture is worth a thousand words… these pictures left out all the important parts.

We should have realized that since this house is older than our parents, that the house would have its fair share of wrinkles.  Truthfully, this house wasn’t completely love at first sight.  We loved all the character, but all the things wrong with it were staring us straight in the face.  We originally set our sights out on a home to fix up, but now we had to have a “Come to Jesus” moment of, “Is this really what we want?”  But who had time for that?  Because we were about to be homeless!

When we left the house, we left a little disappointed..  After all, seeing a house full of cracks and peeling paint doesn’t put most people in a mood to sign an offer.  Two days later however, we still couldn’t stop thinking about the house, even IN the shape that it was in.  Where, previously, we had checked out a couple of homes and left saying, “My heart just isn’t in it.”  This one was different.  We still didn’t know much about the neighborhood, except for noticing families walking on the sidewalks together, children riding bikes with their parents, a few people jogging.  Not a chicken coop or a hula hoop in sight.  This was the opposite end of the spectrum from where we had been living for seven years.  This almost seemed like it was from the show “Leave it to Beaver”.  With the closing of our old house coming up soon, we knew we had to make a decision and we just had the feeling this was the right fit.  Besides, we were still young so what the hell.  Plus… we found out that an open house was scheduled for the upcoming weekend.  So, we decided to jump and to make an offer.  If it wasn’t meant to be, it wouldn’t be.
We’ll spare you the bore of the details pertaining to the offer, only asking one question:  How does a realtor not really use or check their email?  It still blows our minds to this day.  Ultimately, we came to an agreement with the seller and the contract was signed.  On the day of the open house, a friend of ours wanted to see it, so we took her along.  It was the perfect day for an open house; The first beautiful day of Spring.  The house was packed!  Carloads of people were getting out to take a look.  It was clear that people were interested to see what this house looked like on the inside.  Avoiding an awkward situation with the listing realtor, we decided to play along as nosey neighbors instead of the people who “just signed a contract on the house”.
We found out that a lot of families who were already living in the neighborhood were checking this house out because it had tons of room and a big yard that was appealing to families that were expanding.  And here we were– no kids, with a lawnmower that plugged into an outlet, and wanting to downsize–buying a more spacious home with a larger yard that all these families were interested in.  We felt bad that we might be jumping on someone’s dreamhouse, but we realized that in the end, this house was probably perfect for many families, except they needed a house that was move-in ready, and we had our sledgehammer in the trunk.
photo via shaunring.com

Third Time’s A Charm

View From Kitchen

Old Home

Seven years ago, we moved into a townhouse that had just been flipped… and by flipped, we mean they basically put down new carpet and painted the walls beige. This was a perfect opportunity for the flipper because it was almost 2100 square feet with 4 bedrooms and 3 and a half bathrooms, and was only 7 yrs old with no problems. It was also a perfect home for us at the time because of the layout and blank slate we had to work with and that it was probably the most spacious home we could have afforded at the time. Over time, our needs changed, and the neighborhood changed.

I suppose every neighborhood has its story. Yours may include toilet papered trees, loud traffic, or the occasional murder. Ours included a little girl playing with a hula hoop on top of our mailbox, bonfires in the neighbors driveway, and a chicken coop in someone’s front yard. Nevertheless, it was time to move.

We put our house on the market on Valentine’s Day. 16 days and 25 showings later and we had a buyer! Sounds great, huh? We only had one problem… nowhere to move to. At that time, Lexington had a very low inventory of homes for sale and quite a few people looking to buy. We checked websites every single day looking for a new place to call home. We knew we wanted a place with character and one that was not showroom ready–There’s no point buying a house that has been remodeled when we are just going to change everything about it. Our realtor even set us on on an email alert for everything in our price range and desired neighborhoods. Still, nothing. We found that there are plenty of homes with character in Lexington, but they all come with a price tag. You know what you learn about buying–it’s location! location! location!–which we totally ignored the first time around. This time, we tried to find something with the charm, but also with location as key. Well… if there’s two things that drive up the price of a home, it’s location and charm. What can we say? Caviar dreams.

1

House #1, Lansdowne Neighborhood

The first house–great neighborhood: check, charm: blah

OLYMPUS DIGITAL CAMERA

House #2, Lansdowne Neighborhood

The second house–good neighborhood and potential to make money with a remodel: check, charm: negative (well yes it did if  you like midcentury modern, it just wasn’t the style we were looking for)

At that point, we had to re-evaluate our checklist. How can we get what we want where we want it and make sure we can still afford to keep the lights on?

We remembered a house we saw online about a month before that had great curb appeal (or potential) and in need of updating, but we knew nothing about the neighborhood. At that time, we put it in our “maybe” file, and continued looking, but now after getting nowhere, we decided to go look at it… right then. Literally. We dropped everything (even bailed out on dinner plans) to go explore a neighborhood we knew nothing about, Meadowthorpe.