Out of the Closet

In our former home the townhouse, we had a powder bathroom on the main floor that always came in very handy when guests were over.  However, in this house the only bathroom on the main floor was the master bathroom.  And if you’ll remember, it wasn’t that pretty…

IMG_4535

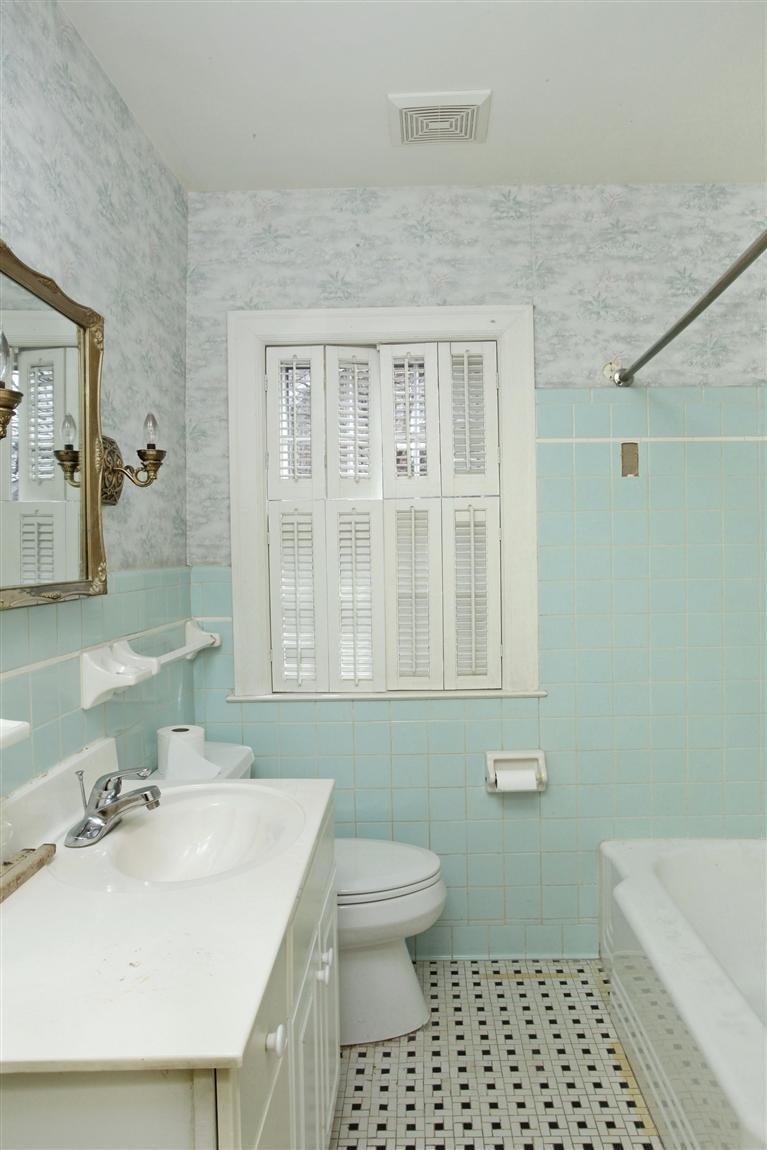
original master bath

So as you can imagine, adding a half bath was at the top of our checklist.  There was way more storage space in this house than we could ever use and not enought toilets, so we decided to combine the coat closet and a small linen closet into a powder bathroom.  Only one big problem… Have you ever tried to sit on the throne in your coat closet?  As it turns out, we needed 5 more inches.  Cue the sledgehammer!

If only moving a wall were just that easy, if it was only simply sliding it in place.  What we really mean is tearing down an existing wall and building a brand new one…literally 5 inches from where it was to start with..  Images of this demo were in our blog called “Ready, set, demo”.

DSC_1319

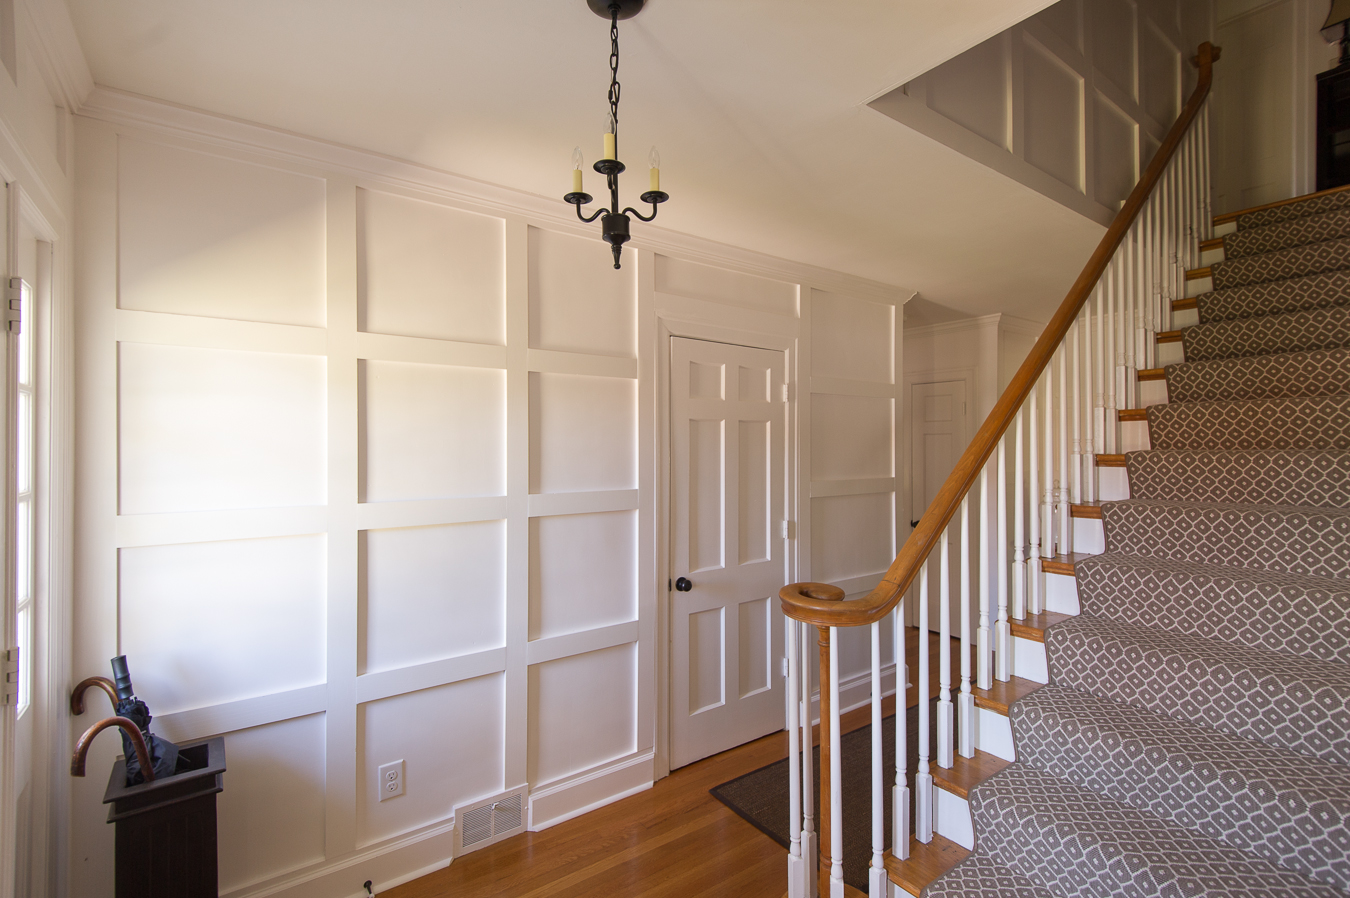
You can see the door in the center left to the coat closet, and then on the center right the thin door to the hall closet here that were combined to make the powder.

Because the foyer was totally trimmed out, we didn’t want the bathroom to go neglected and seem forgotten.  We also didn’t want it to seem like a little trim cave up to the ceiling, so we did board and batton trim a little over half way up the wall, and finished with crown molding at the top.  The paint colors were the same that we used in the foyer:  Anew Gray for the walls and, of course, all the trim is Snowbound.

Since this is just a powder bathroom, there was no real need for a vanity with lots of storage so we chose to do a simple pedestal sink.  For the light fixtures and faucet finishes, we wanted something that spoke to the true era of the house–something not too modern but not antique.  We chose a mixture of antique brass and iron for the sconces and faucet; something we plan to carry throughout the entire house.

When it comes to decor in a powder bathroom, there’s not much, which means everything you use should be special.  Although we used a pedestal sink from Lowes, we didn’t want the details to look like they came from Lowes.  So for the mirror, our hunt took us to many stores and eventually online to etsy.com.  Here we found someone who could hand-make a mirror out of an antique horse bit and bridle.  We love that we have something unique in there! 0076

0061
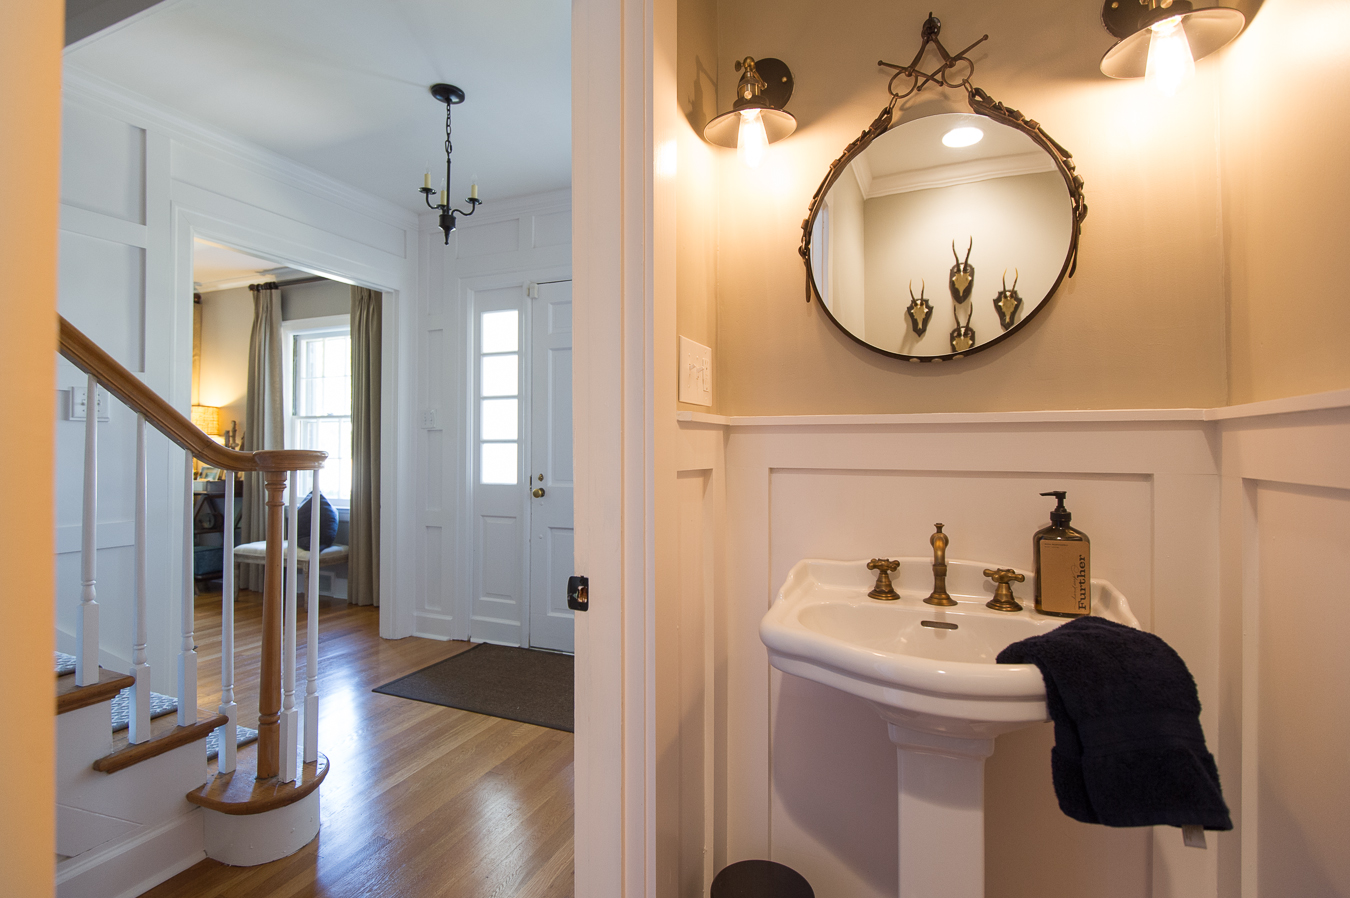
Although there is no image of the toilet in the powder, it is there.  Not surprising, they don’t photograph very well.  “You just can’t make them look sexy”, says our photographer/realtor/friend Shaun Ring.

Even though the room is barely 3’x6.5′, we tried to add the detail that would make it special and interesting! It may be easy to think “Hey, it’s a small powder room, it doesn’t need anything special”, but we think that’s a lost opportunity for great detail. A few pieces of wood, great lighting, and accessories can make a big impression! Not bad for coming out of the closet! 🙂


First Impressions

We finally have updates!!!!

Just a reminder of what we were working with here.

We showed you in our previous blogs “What goes up, must come down” and “Trimming out the foyer” the inspiration for the foyer as well as the mess of taking down all the old wallpaper(s).

First things first, we had to deal with the old vinyl tile floor throughout the foyer and dining room.  We knew underneath was the original hardwood floor, although we didn’t know what condition it was in.  What else we didn’t know was that under the tile was a thin piece of lauan which was attached to the hardwood with 3,000 stables that had to be yanked out by hand.

We celebrated our triumph over the staples, a task we never thought would end!  The floors were then refinished, then FINALLY we started to get the trim up on the walls.

On the second floor, we decided to paint the top 1/4 of the wall Anew Gray from Sherwin Williams.  We debated using grasscloth here, but to keep costs down we decided to paint because we can add grasscloth later if we want.

In case you didn’t know, there are approximately 100 million “whites” to chose from when searching for a paint color.  We knew we had to get it right because you see so much of it and it’s the first thing you see when you walk in the door.  We wanted something bright and crisp, but nothing florescent.  We chose “Snowbound” from Sherwin Williams.  This decision set the tone–if you will–for the rest of the trim throughout the whole house.

Lets fast forward past 14 tubes of caulk, a 4-hour sanding party, 2 layers of primer, and 4 coats of paint.  Here is the final result–as it would be, we trimmed it in white!  FUN FACT: There are 97 squares in the foyer!

You may notice the lack of hanging wall art.  We debated whether to hang art or not, but ultimately decided not to because we wanted to showcase the trim.

0056

We found a carpet remnant from our friend Carrie at Carpet One that we had installed as the runner for the stairs.  We totally lucked into finding something that we loved so quickly, not to mention it was a great wool carpet that originally was expensive, but as carpet left over from a previous job was inexpensive.  What we didn’t think we were going to find so easily was a light fixture for the foyer.  Every night after caulking and painting, we would search the internet for the right fixture.  We weren’t having any luck as nothing seemed to fit the bill. Every one we seemed to like was at least $800 or was back-ordered.  So, just to move forward with a temporary fix, we decided to use a fixture that we had in a cardboard box for at least 7 years. It was a light that we had bought at a super clearance sale that was just to good to pass up, but had never had the right place to put it.  Much to our surprise after putting it up, we thought it was perfect and decided to keep it.  It was small and it actually fit the bill-not too ornate, and updated traditional.

All in all, the foyer wasn’t an inexpensive feat, but it has been worth every dime because it’s what everyone talks about when they first walk in, and we still LOVE IT!!!

Special thanks to our amazing photographer and realtor friend Shaun Ring for taking the awesome photos!


Trimming out the foyer

Unlike our last house, this house actually has a foyer.  Before, you walked directly into the kitchen, so we focused on trying to make that space welcoming–which often times with dirty dishes was an uphill battle.  This foyer–as bad as the wallpaper was–was already pretty welcoming, but we really wanted to make a bold statement, and how else did we do that but with trim!

Here was our inspiration…

79798652d744e109d59e74377f8c020e

When it comes to trim, both of us prefer shaker or simple flat panel styles.  Our overall taste is updated traditional, with the keyword being “updated”, meaning having traditional lines in updated refined finishes.  So when this crosses over to trim, less detail is more.  Here are the current in-progress photos of our foyer.

We continued the trim-work throughout the foyer, up the stairs, and around the 2nd floor landing.  On the landing, we stopped the trim 3/4 of the way up the wall and added a ledge.  We will either paint an accent color or add grassclothe to the top.

There is still more work to do!  Nail holes have to be filled and sanded, the edges need to be caulked and primed, and then finally painted… WHITE!

We love trim!

We love trim.  Crown moulding, wainscotting, plank, beadboard…we could go on, but we’ll save you the bore.  What we love even more, is trim painted white (cue naming the blog Trim It In White).    It really is a fool proof way to add character to a space.  Here’s an example of that, this is what we did in our old home- a boring old duplex.

So when we bought our current house that had so much character on the outside, we knew we wanted to add a lot of trim to this house, so off to Pinterest we went for inspiration.  Here are a few things we just loved and wanted to try to use in our Powder bath and Foyer.

If you would like to follow Big Jeremy’s Pinterest board affectionately called “I love trim” please see below!


What goes up, must come down

If there’s one thing we know, a fresh coat paint can totally change a room.  However, before we could even think about paint colors, we had to get down wallpaper. Fortunately for us, there was only one space that had existing wallpaper, and that was the foyer.  Over the years, we’ve heard many horror stories of people spending hours and hours taking down wallpaper, and were hoping that we wouldn’t  have our own war story to share as well in the end.

After talking with some of our friends about their experiences, we found that the most popular method of wallpaper removal is by magical powers of a wallpaper steamer.  We were fortunate enough to have not one, but TWO people lend us their steamers, and THANK GOD!  Honestly, the steamer was a game changer… and a sanity saver… and a relationship saver.

You never know what lurks behind wallpaper.  For us, we found that behind layer #1 was layer #2.  Behind layer #2 was the original plaster, which was in great shape.


Over about 4 nights, working 4 or 5 hours a night, we were able to tackle all of the wallpaper.  Once you get the hang of it *pun intended*, you can really speed through it.  Before you know it, you’ve got a really big sticky, smelly pile of wallpaper.

It truthfully wasn’t that bad and we knew what we were working towards, so the sweat equity made it all worth it.

Most photos via crappy Iphone camera, great photo by shaunring.com